

Table of Contents
Part 1 - Keychain Material Types
Part 2 - What tools do you need for custom keychains?
Part 3 - Acrylic vs. Resin Keychains: Which is better?
Part 4 - Design and Personalization Tips
Part 5 - How do you make a keychain step by step?
Part 6 - Photo Keychains for Gifting
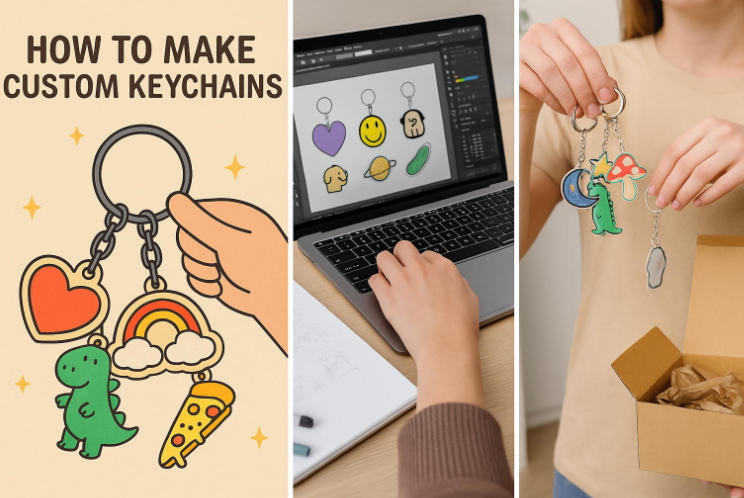
"These could use a little personality"? You're not alone. From meaningful gifts to trendy side hustles, learning how to make custom keychains at home is catching on fast across kitchens and craft tables in Canada. It’s an easy, low-cost way to create something truly yours—no fancy workshop or art degree required.

“People want more than mass-produced stuff—they want a story,” says craft blogger Amy Latta, known for her viral acrylic keychain tutorials. That’s what makes handmade keychains so appealing: they carry charm, sentiment, and even profit potential.
This guide walks you through the good stuff—like picking the right materials, personalizing designs, and even selling your creations online. If you’ve got 30 spare minutes, a few supplies, and a spark of creativity, you’re already halfway there.
Picking the right material is your first real move—your custom keychain’s vibe, cost, and durability all start here.
There’s something timeless about leather—it smells good, wears well, and just screams rustic charm. Handmade leather keychains make thoughtful accessories or gifts, especially with some simple tooling or stamping. You don’t need a saddle shop to get started; leather scraps, a metal ring, and a bit of elbow grease go a long way in creating rugged, charming keychains that feel both vintage and personal.

Ideal for laser engraving or pyrography
Timber blanks come in various shapes/sizes
Great for layering paint, initials, or carved icons
Wooden blanks are your go-to for crisp customizations and warm, natural aesthetics. They’re easy to engrave and work well in rustic or minimalist designs.

Epoxy vs. UV Resin – Epoxy gives a longer working time, while UV resin cures fast under light.
Clear or Pigmented – You can keep it glassy or mix in pigments, glitter, or even dried flowers.
Mold Choices – Start with silicone molds in basic shapes like circles or hearts—easy to pour, less mess.
Resin crafting might look fancy on Instagram, but once you nail the mix ratio (usually 1:1 resin to hardener), it’s all smooth sailing.

Feeling crafty on a budget? Upcycled keychains are both wallet-friendly and planet-friendly.
Use old denim, bottle caps, or even Scrabble tiles.
Repurpose broken earrings, fabric scraps, or wood bits.
“You’d be surprised what a little creativity and a hot glue gun can transform,” says Toronto-based crafter Elise Moore.
This DIY approach lets you turn trash into trendy—zero waste, all style.
You don’t need a full-blown workshop to start making custom keychains—just the right tools and a bit of crafty energy.
Working with resin or shrink film? You’ll want a few heat tools handy to make the magic happen. A heat gun or hot air wand helps cure resin evenly and without bubbles. For shrink film, a craft iron or embossing tool works well to shape and shrink without warping. Just keep it moving—no one wants a scorched lanyard. Drying tools like a heat press speed things up and keep the finish smooth and pro-level.
“Controlling heat is everything—get that wrong and your whole piece warps,” says Anna M., resin artist and small shop owner in Toronto.
Want crisp, clean designs on acrylic keychains? A vinyl cutter like the Cricut machine or Silhouette Cameo is your go-to gear. Pair them with cutting mats, plotters, and design software to cut out logos, names, and intricate art from vinyl sheets. Use scoring tools for fine lines and engraving tools if you’re ready to level up. Oh, and keep your blades sharp—dull ones just chew up your acrylic blanks.
On a budget? No stress. Plenty of starter packs come with all the craft essentials you need—think jump rings, pliers, cutting blades, and even blank keychains. These beginner-friendly kits are often available at craft stores or online for under $50. Great for testing the waters without draining your wallet.
| Kit Name | Contents | Avg. Price (CAD) |
|---|---|---|
| Keychain DIY Kit | Jump rings, blanks, pliers, glue | $36 |
| Resin Starter Pack | UV resin, gloves, mold, heat tool | $42 |
| Vinyl Craft Bundle | Vinyl sheets, weeding tool, scraper | $28 |
“I tell my customers straight up—acrylic is sharper, but resin is deeper,” says Jamie Lau, a craft seller from Toronto with over 800 five-star Etsy reviews. Her workshop is lined with laser cutters and silicone molds, and she has worked extensively with both materials.

From a clarity standpoint, acrylic offers a sleek, glass-like shine. It comes pre-cut, ready to customize with vinyl, paint, or engraving. Resin, by contrast, delivers a richer, three-dimensional effect—especially when embedding glitter, flowers, or photos.
For durability, acrylic wins for daily wear. Resin tends to yellow if exposed to UV light over time unless sealed with a top-grade UV-resistant coating. Jamie notes, “Resin looks dreamy, but if you are rough on your keys, acrylic handles more abuse.”
In terms of cost and production process, resin requires more setup: mixing, pouring, curing, and sanding. Its curing time often ranges from 12–24 hours. Acrylic is quicker—less mess, fewer tools. As Jamie explains, “I can crank out 10 acrylics in the time it takes one resin to dry.”
Safety is also a factor. Resin involves chemical handling. Gloves, masks, and ventilation are not optional. Acrylic, on the other hand, is safer and cleaner to work with—perfect for home crafters.
Tool requirements vary too:
Acrylic: Cricut, weeding tools, transfer tape
Resin: Silicone molds, torch, UV lamp, protective gear
Every material has a purpose. Buyers should weigh finish options, ease of use, and the intended lifestyle of the keychain. Awards like Handmade Canada’s Top Resin Maker 2024 have validated the premium quality of well-made resin products, but for speed and simplicity, acrylic often gets the job done cleaner.
Choosing between acrylic and resin? Think about your design goals—and how much mess you are willing to clean up.
Adding your own flair is what takes a keychain from “meh” to “wow.” Here’s how to make designs pop with creativity, meaning, and lasting quality.
Customizing with vinyl decals is one of the easiest ways to personalize your keychain. Use a cutting machine to carve out names or words, then apply with transfer tape for a smooth, clean finish. Make sure the surface is dust-free, and press firmly with a scraper tool to set the adhesive. Bonus tip? Matte vinyl hides bubbles better than glossy!
Go bold for short names, script for elegance.
Balance proportion: big names need bigger blanks.
Use sans-serif fonts for better readability on mini keychains.
Test the size on paper before cutting—saves waste and regret.
Maintain visual hierarchy: name > subtitle (if any).
You’ve got options for eye-catching embellishments! Add glitter for sparkle, photos for sentiment, or pressed flowers for that earthy aesthetic. Mix them with resin or decoupage adhesive. A few natural petals or a tiny photo square sealed in clear coat gives your keychain texture and character. As my gran says, “A little sparkle never hurt nobody.”
Layering adds depth—stack clear acrylic over artwork.
Double-sided designs maximize space for more creativity.
Use transparent vinyl or epoxy to fuse layers cleanly.
Try layering fonts over background prints for extra visual punch.
Each layer should dry before the next goes on—no shortcuts here!
| Sealant Type | Finish | Dry Time (hrs) |
|---|---|---|
| UV Resin | Glossy | 2 |
| Clear Acrylic Spray | Matte | 1 |
| Epoxy | Ultra-gloss | 12 |
Use the right sealant to keep designs looking sharp. Apply in light layers and let each coat cure. For outdoor use, pick non-yellowing UV protection to fight fading.
Getting hands-on is where the magic happens. This cluster gives you the real-world setup and rookie-proof tips to make your first keychain project smooth and stress-free.
Your workspace doesn’t need to be fancy—but it does need to be functional. Clear a flat table near a power outlet. Good lighting (natural if possible) saves your eyes and your project. Use a comfy chair and add shelves or bins to organize tools and materials. A well-ventilated area is key for resin work. Don’t forget cleaning supplies for spills and safety gear like gloves if you’re using adhesives or chemicals.
💡 Tip: A magnetic strip on the wall is perfect for holding small metal tools without clutter.
Skipping research: Jumping in without reading instructions can lead to damage or wasted supplies.
Wrong cleaner use: Cleaning acrylic with harsh chemicals causes streaks or discoloration—use mild soap.
Not pre-testing materials: Mixing incompatible paints, glues, or resins can cause shrinkage or cracking.
Rushing the curing process: Impatience leads to sticky resin or poorly bonded layers. Let things set fully.
🛠️ As artist Tasha Cline puts it, “Patience and prep are half the project. The rest is just creativity.”
“When my daughter opened her birthday gift and saw a photo keychain of our last camping trip, she started crying—happy tears,” shared Emily Chen, a Toronto-based small-batch keychain maker whose Etsy shop has over 1,200 five-star reviews. Emotional gifting moments like these are why photo keychains have become a favourite keepsake across Canada.

To create meaningful photo keychains, attention to detail is essential. From selecting crisp, high-resolution images to using waterproof paper and resin sealer, each step influences the final result. Experts like Amy Latta, author of Hand Lettering for Relaxation, recommend Canon MegaTank printers and precision craft cutters to achieve sharp photo finishes.
Key materials and techniques include:
Materials and Tools: Blank acrylics, UV resin, inkjet printer, cutting board, metal jump rings
Photo Selection and Prep: Choose bright, centered photos; resize using Canva or Cricut Design Space
Printing and Cutting: Print on glossy photo paper, then trim with accuracy using a precision blade
Assembly Techniques: Align the photo carefully on the blank; use glue dots or mod podge for placement
Sealing and Finishing: Use UV resin for a glossy, durable finish
Adding Personal Touches: Stickers, initials, mini tassels
Creative Design Ideas: Match keychains to birthdays, anniversaries, or pet portraits
Packaging for Gifting: Use kraft boxes, velvet bags, or custom tags
Care and Maintenance: Avoid extreme heat; wipe with microfiber cloth
Gift Presentation: Include a note card with the story behind the photo
Award-winning craft supply companies like Arteza and Cricut often promote this DIY category during seasonal campaigns, making it a trusted space for both creativity and quality gifting.
Thinking of turning your hobby into some extra cash? Selling custom keychains online is easier than ever—with a little know-how, strategy, and charm.
Nail your pricing from the start to stay profitable.
Calculate your cost of goods, including material costs and overhead.
Add a labor rate that respects your time.
Check competitor pricing for similar handmade goods.
Include a profit margin that allows growth, but keeps value clear. Tip: Consider separate wholesale and retail pricing tiers.
Branding isn’t just a fancy logo—it’s how customers remember you.
Define your brand story and mission statement
Create consistent visual branding with strong logo design
Use a friendly brand voice across all content
Know your target audience and their vibes
Stick to your brand guidelines on socials and packaging
“Great branding builds trust—people buy into stories, not just products,” says Lisa Tran, a Canadian Etsy coach.
Start small or scale up—these platforms got you:
Etsy Canada – great for handmade and niche buyers
Shopify – best if you want full store control
Facebook Marketplace – perfect for local pickup and low fees
Amazon Handmade – high visibility, but strict approval
Local craft fairs and pop-ups—still gold for face-to-face selling
Make the unboxing experience part of your brand:
Add custom packaging like kraft boxes or drawstring bags
Use eco-friendly materials—Canadians love sustainability
Include thank you notes and labels for personal touch
Protect items with void fill like crinkle paper or bubble wrap 💡 Small touches = big impressions.
A good photo sells the vibe. Literally. • Use natural light near a window or lightbox • Style your shots with background props or textured fabric • Try a macro lens or use your phone's portrait mode • Keep the white balance clean and colors true • Edit with free editing software like Snapseed or Lightroom
A quick look at how to stay in the green:
| Tool/Metric | Use Case | Avg. Monthly Cost (CAD) |
|---|---|---|
| Bookkeeping software | Expense tracking + tax prep | $0–$30 |
| Inventory costs | Material budgeting | Variable |
| Profit calculation | Net income from each item | — |
Keep tabs using profit and loss statements. Knowing your break-even point keeps surprises off your plate.
Finding the right supplies can make or break your DIY keychain game. Here's where to get blanks, when to buy in bulk, and how to keep it eco-conscious.
Canadian suppliers have stepped up for crafters. You’ll find DIY kits and fabric blanks at local craft stores or online platforms like Etsy Canada and Michael’s. Looking for niche styles? Lamp shade frames, drum shades, and spider fitters can be repurposed creatively. Wholesale options are often found at Deserres, Uline, and smaller B2B sites offering empire shades and uno fitters to upcycle.
Let’s break it down:
| Buying Style | Average Cost/Unit | Ideal For |
|---|---|---|
| Small Packs | $1.50 – $2.50 | Beginners, short runs |
| Bulk Supplies | $0.40 – $0.90 | Sellers, big batches |
Bulk supplies offer better wholesale pricing and help with inventory planning.
Small packs are good for testing new materials without committing.
Crafters doing seasonal sales often scale with volume buying for better margins.
Want to keep things green? Canadian eco-friendly suppliers are offering more biodegradable and non-toxic options than ever. Think organic cotton, recycled fabrics, or even upcycled metal rings.
“Green crafting is no longer niche—it’s how future makers stand out,” says Lara Jean, founder of GreenLoop Supplies.
Look for responsible suppliers promoting ethical sourcing and natural fibers. They’ll often flag items as sustainable materials—and some even ship with compostable packaging. Let your keychains do the talking—ethically!
Crafting custom keychains at home isn’t just a fun weekend project—it’s a way to turn everyday scraps into something personal, useful, and maybe even profitable. From resin pours to photo keepsakes, you’ve got all the tools to get started right at your fingertips.
“Small crafts lead to big smiles,” says maker Amy Latta. “That’s what keeps people coming back to DIY.”
So grab your gear, trust your gut, and don’t overthink it. The best keychains aren’t perfect—they’re personal. Let your creativity take the wheel.
It depends on the material and method. A simple vinyl or photo keychain might take 15–30 minutes. Resin designs, on the other hand, need curing time and could take up to 24 hours. If you're batching them, the hands-on time stays low per piece.
Go for epoxy resin—it’s durable, crystal clear, and beginner-friendly. Make sure it’s labeled non-toxic and comes with a 1:1 mixing ratio. UV resin is also an option if you’re working on smaller pieces and want quicker curing under a UV lamp.
Absolutely. Cricut machines are ideal for:
They're not essential but definitely handy if you're into crafting as a hobby or business.
Cutting vinyl decals for acrylic blanks
Personalizing leather tags or faux suede
Making shrink plastic keychains from printable sheets
Creating stencils for painting or etching
Start small with things you probably already have at home: cardboard templates, old key rings, scissors, glue, and some scrap fabric or paper. Acrylic blanks and printable shrink film can be found in multi-packs online for under $20. The trick is to keep it fun, not fancy.
Fading happens with friction or UV exposure. Here’s how to protect your work:
Taking these extra steps helps your design last way beyond just a few months.
Seal the design with a clear topcoat or resin
Use UV-resistant vinyl or ink
Avoid overly thin coatings or water-based glues
Let paint or ink fully cure before sealing
Hearts, circles, stars, rectangles, dog bones, and even custom initials. Popular shapes are easy to find online, and people love the option to personalize with their name or a cute phrase.
Technically, no. Selling anything with Disney characters, sports logos, or famous quotes without permission can get you into legal trouble. If it’s for personal use, it’s usually fine—but for selling, stick to your own art or royalty-free graphics.


Join our newsletter
Let's be friends with benefits
Be the first to get product launches, discounts and
exclusive content straight to your inbox.

SHOPZENMA
Office Hours: Mon- Fri 9 AM - 5 PM (EST)
Contact Us
[email protected]
